Dell XPS 13 laptop won’t turn on, LED lights not working [SOLVED]
Yesterday morning I was using my Dell XPS 13 ultrabook and as usual, I closed the lid when I was done which puts the laptop on standby mode. Then 2 hours later, I went to a café to do some writing but when I tried to turn it on nothing happened! I pressed the battery indicator on the side to see how much battery was left and no lights showed up. I was pretty sure the battery was close to full when I put it to sleep mode so it can’t be completely drained.
I finished my coffee and quickly went back to my hotel to plug it in to a power source to see if it will charge, but the LED light in front that lights up when the machine is plugged in did nothing. Pressed and hold the power button for a few seconds and released it and still nothing.
I had a feeling I just had to unplug the battery and plug it back in as I’ve seen this issue with other laptops before. But since ultrabooks are designed to be light and thin, the battery is usually not easily accessible. It’s usually inside the machine plugged in to the motherboard directly.
I wanted to open it up so badly at that moment but I didn’t have the proper tool. I also wasn’t sure if opening up the machine would void my warranty, so I tried to call up Dell. Because of the time difference, when I called tech support they weren’t available so I had to wait a few more hours to call them. I called them again later that day and went through the basic troubleshooting but no luck. Also, since I didn’t have international warranty I will have to ship the machine back to the US to get it fixed! That would take weeks to over a month to get it back.
I told the technician on the phone that I think it’s possible that the battery just needs to be unplugged and re-plugged but I’ll need to open it up. I asked her if that would void my warranty. She put me on hold for a few minutes so she could ask her supervisor about this. She said I could try it, but if I damage anything while doing it (if the repair technician could tell it was due to me messing around with the machine), then they won’t support it. Fair enough.
I looked at some pictures online of the internals and the layout was simple enough. I don’t have to go deep to get to the battery. It’s basically right under the main cover, I just need to remove the main cover and the battery connector is accessible right away.
Tools Needed:
- Torx 5 Screwdriver
I bought a set of 6 torx screwdrivers of different sizes this afternoon for less than $5 at a hardware at a nearby mall. They don’t sell individual pieces so I had to buy the entire set.
Steps for Fixing the Issue:
1. Unplug everything from your laptop (power cord, cables, USB devices, etc.).
2. Use a torx #5 screwdriver to unscrew the 10 screws at the bottom of the machine.
3. Gently remove the cover. I used a credit card to help pry it.
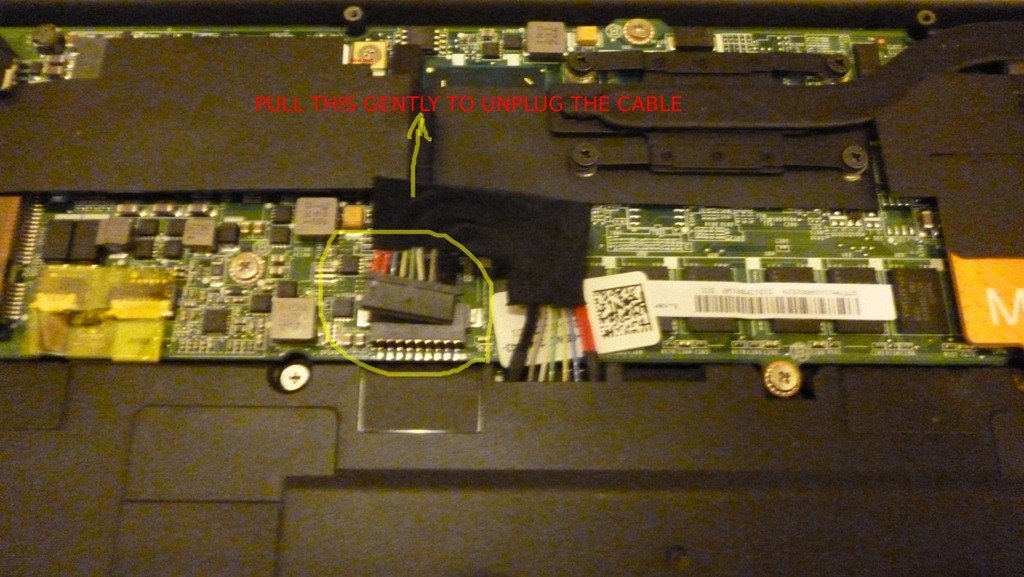
4. You’ll see a small cable connector that connects the battery to the main board. Gently remove it by pulling on the black thing wrapping the cables.
5. While the battery cable is still unplugged, press and hold the power button for 30 seconds and release it.
6. Plug the battery cable back in.
7. Put the cover back on (don’t screw it down just yet).
8. Press the power button for a second or two and it should hopefully turn back on! (If it doesn’t, remove the cover and unplug the battery cable again and leave it unplugged for about 5 minutes and press and hold the power button again for 30 seconds just like before.)
9. If #8 worked, shut down the machine and tighten the screws back in place.
So the main idea here is to unplug the battery and press the power button for about 30 seconds to drain any remaining electrical charge. This trick works with other laptops as well and not just the XPS 13, and if the battery is not inside the casing then it’s a lot easier to do.
I’m really happy right now that my laptop is working again. I got so much stuff I want to get done: blog posts to write, research to do, pictures to upload, and some coding as well.